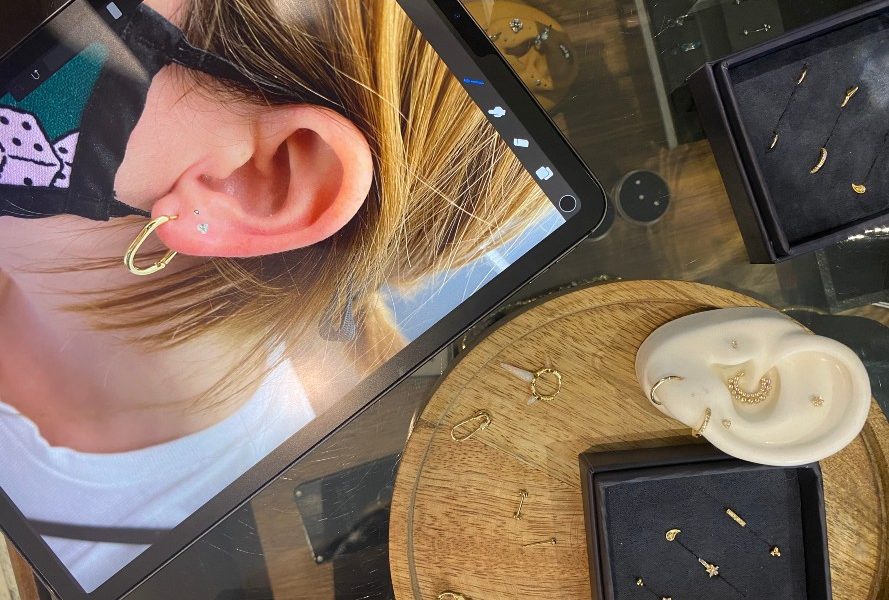
I’m not sure I can pinpoint (ha) the moment I became obsessed with curated ears and stacked lobe piercings. I must have clocked them on style icons like Zoë Kravitz, or maybe seeing them on professional athletes convinced me that they wouldn’t get in the way of my active lifestyle. Or maybe I just unearthed some latent urge to poke holes in my lobes like it’s 1999.
Either way, I’ve been coveting a subtly blinged-out ear for quite a while. I even went so far as to almost get them done at the mall, but moments before the gun (red flag) pierced my skin, I backed out. Using my better judgment, I determined I should probably go about my piercing the legit way, for both my health and to achieve the very specific look I wanted. I put my ear to the ground on my quest for an expertly curated (and healed) ear.
We chat with the creative director behind an outerwear brand that’s ho-po vegan.
So, what is a stacked lobe (or ear stack)?
Stacked lobes are earlobe piercings, typically placed low, with a tiny piece of jewellery above the initial piercing. However, you can play around with composition, placement and jewellery shape to make it your own. You typically see these alongside other piercings in a curated ear with dainty, minimalist jewellery.
And while I thought this trend was new, it turns out, I’m behind the times. “I started seeing this type of piercing trend about four to five years ago when I noticed lines of dainty jewellery hitting the market,” says Ion Nicolae, owner of Toronto’s Black Line Studio, a tattoo and piercing studio in Toronto. He notes that this shift to understated styles even made its way to the body jewellery world, too.
Step one: Map out the right piercings for your ear
Getting started, I show Nicolae my reference photo, and while he can glean the look I’m going for, he says he never tries to replicate these piercings 100%. “Based on those reference photos, we can look at the person’s ear and decide what would look best,” says Nicolae. “Just because something looks great on somebody else doesn’t mean it will look good on someone else.” Haven’t we all learned that the hard way with haircuts? Just me?
Turns out, an ear is a lot like a fingerprint: everyone’s is a bit different. And apparently, I have a really interesting ear (I’m vain now). He notes that I have a fold that goes all the way around my ear (compared to his, for instance, which stops about mid-way) and that means I have more options for piercings.
So, based on the look I like, and my ear shape, they map out an image of what would work on me (above). You get a sneak preview of your ear and decide if you like it before they start poking holes.
After playing around with a few placements, I decide to go for what’s displayed above. The cool part is that I can always play around with jewellery shapes (like stars, half moons, chained jewellery or even safety pin hoops) or add more piercings if I decide I want to freshen up the look. Plus, they pierce with the same jewellery I want, so I don’t have to swap anything out when it’s healed and the look will be achieved instantly (minus a bit of swelling).
Sun-kissed skin anytime of the year. Oh, yeah!
Step two: Choosing jewellery & the number of piercings
Blackline has an array of jewellery, all of which offer a different look. You can end up with a serious statement ear, or something more subtle, which is my preference. But more important than the look is the material. Basically, avoiding infection and irritation is everything when it comes to piercings.
Nicolae explains that they only pierce with hypoallergenic materials, most of which is totally (or mostly) nickle-free. They offer 14K solid gold, 18K nickel-free gold and surgical steel. He says even if you’re getting gold or silver, you should check that it’s nickel-free if you’re sensitive since these are often blended together.
Next, we decide if this should be a one-shot deal. “If you’re doing a lot of cartilage, I recommend only doing two or three piercings at a time,” says Nicolae. ”You don’t want to overwhelm the ear.” Plus, he explains that the more piercings you put in the longer it takes to heal, and the longer it takes to heal, the more chances of infection.
If you’re piercing cartilage, he says it’s ideal to do one ear at a time. (Think about it: If both ears are healing, what are side sleepers going to do?). If you’re only focusing on lobes, you can do both sides in the same session, and probably about two to three per ear to start.
Finally, we take the plunge, and I lean back to get the piercings. The whole process probably takes about 10 minutes and doesn’t hurt as much as I expected.
This Netflix star shares how she finds her confidence.
How to clean a piercing
Bactine or no Bactine, that is the question. If you’re curious about how to care for your newly pierced ear, Nicolae says don’t turn to Google. “There are so many products on the market, you’ll just get confused,” he says. “But most piercers will agree that you need some type of saline water solution.” However, getting the right formula can be tricky. “If it’s too strong you’ll irritate the piercing, if it’s not strong enough, you’re not cleaning it properly.” He recommends these pre-filled swabs to care for piercings. And to save products like Bactine, rubbing alcohol, hydrogen peroxide or Polysporin if you encounter infection.
He also recommends moving the jewellery: “Moving it will bring oxygen into the piercing and help it heal. Start by washing your hands, then take a Q-Tip with lukewarm water to each side of the piercing to soften it up, and remove dried blood, dust, dirt and so on,” says Nicolae. “Then, cleanse the piercing with skin cleanser (or wound wash) to clean it further.” Now that your piercing is squeaky clean, he says to use the saline swab and move the jewellery along it, so that you’re killing bacteria outside the piercing and bringing the solution and allowing oxygen inside.

